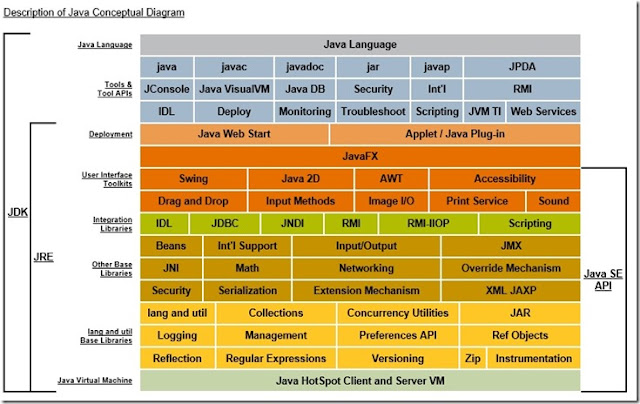
Whenever we install Java using JDK installer it creates two folders in installation directory one for JDK and one for JRE. However, JDK folder also contains one JRE folder itself and both have the same directory structure.

JDK Structure
JDK Structure

Let’s assume JDK is installed at \jdk1.7.0, below are some of the most important directories and their explanation
jdk1.7.0
    db
    include
    src.zip
    bin
         java*
         javac*
         javap*
         javah*
         javadoc*
    lib
         tools.jar
         dt.jar
    jre
         bin
              java*
         lib
              applet
              ext
                   jfxrt.jar
                   localdata.jar
              fonts
              security
              sparc
                   server
                   client
              rt.jar
              Charsets.jar


\jdk1.7.0 → This is the root directory of the JDK software installation which contains copyright, license, and readme files, src.zip and all other directories.


\jdk1.7.0\bin → Contains files for all executable tools which are necessary for Java program development . The PATH environment variable should contain an entry for this directory. Some of them are
  • appletviewer: Run and debug applets without a web browser.
  • extcheck: Utility to detect Jar conflicts.
  • jar: Create and manage Java Archive (JAR) files.
  • java: The launcher for Java applications.
  • javac: The compiler for the Java programming language.
  • javadoc: API documentation generator.
  • javah: C header and stub generator. Used to write native methods.
  • javap: Class file disassembler
  • jdb: The Java Debugger.


For more information on the tools, see the JDK Tools.


\jdk1.7.0\lib → Files used by the development tools, includes the following:
  • tools.jar: Contains non-core classes for support of the tools and utilities in the JDK.
  • dt.jar: DesignTime archive of BeanInfo files that tell interactive development environments (IDEs) how to display the Java components and how to let the developer customize them for an application.
  • ant-javafx.jar: Contains Ant tasks for packaging JavaFX applications; see Packaging in Deploying JavaFX Applications.
Other jars are jconsole.jar, packager.jar, sa-jdi.jar.


\jdk1.7.0\jre → Root directory of the Java runtime environment used by the JDK development tools. The runtime environment is an implementation of the Java platform. This is the directory represented by the java.home system property.


\jdk1.7.0\jre\bin → Contains executable files and DLLs for tools and libraries used by the Java platform. The executable files are identical to files in /jdk1.7.0/bin. The java launcher tool serves as an application launcher (and replaced the old jre tool that shipped with 1.1 versions of the JDK). This directory does not need to be in the PATH environment variable.


\jdk1.7.0\jre\bin\client → Contains the DLL files used by the Java HotSpot™ Client Virtual Machine.


\jdk1.7.0\jre\bin\server → Contains the DLL files used by the Java HotSpot™ Server Virtual Machine.


\jdk1.7.0\jre\lib → Code libraries, property settings, and resource files used by the Java runtime environment. For example:
  • rt.jar: Contains all Java platform's core API classes. These classes are loaded by Bootstrap Classloader.
  • charsets.jar: Character conversion classes
  • jfxrt.jar: JavaFX runtime libraries
Aside from the ext subdirectory (described below), there are several additional resource subdirectories not described here.


\jdk1.7.0\jre\lib\ext → Default installation directory for Extensions to the Java platform, Loaded by extension classloader.
  • localedata.jar: locale data for java.text and java.util.


\jdk1.7.0\jre\lib\security → Contains files used for security management. These include the security policy (java.policy) and security properties (java.security) files.


\jdk1.7.0\jre\lib\applet → Jar files containing support classes for applets can be placed in the lib/applet/ directory. This reduces startup time for large applets by allowing applet classes to be pre-loaded from the local file system by the applet class loader, providing the same protections as if they had been downloaded over the net.


\jdk1.7.0\jre\lib\fonts Contains TrueType font files for use by the platform.

There are some additional files and directories which are not required to a Java developer like below


\jdk1.7.0\src.zip → Archive containing source code for the Java platform.
\jdk1.7.0\db → Contains Java DB.
\jdk1.7.0\include → C language header files that support native-code programming using the Java Native Interface and the Java Virtual Machine Debugger Interface.

Reference: Java Documentation
According to Java standards and common practices, we should declare every class in its own source file. And even if we declare multiple classes in the single source file (.java) still each class will have its own class file after compilation. But the fact is that we can declare more than one class in a single source file with below constraints,
  • Each source file should contain only one public class and the name of that public class should be similar to the name of the source file.
  • If you are declaring the main method in your source file then main should lie in that public class

If there is no public class in the source file then main method can lie in any class and we can give any name to the source file.
If you are not following 1st constraint then you will receive a compilation error saying “The public type A must be defined in its own file”. While if you are not following the second constraint you will receive an error “Error: Could not find or load main class User” after the execution of the program and if you will try this in Eclipse then you will not get the option to execute the program.

Here we are talking about only top level classes, we can declare more than one public inner class.

Why only one public class per source file

Now we know that we can’t declare more than one public file in the single source file, Now we will look at why we can’t do this or why it is not allowed in Java.

Well, actually it is an optional restriction according to Java Language Specification (Section 7.6, Page No. 209) but followed by Oracle Java compiler as a mandatory restriction. According to Java Language Specification,

When packages are stored in a file system (§7.2.1), the host system may choose to enforce the restriction that it is a compile-time error if a type is not found in a file under a name composed of the type name plus an extension (such as .java or .jav) if either of the following is true:
  • The type is referred to by code in other compilation units of the package in which the type is declared.
  • The type is declared public (and therefore is potentially accessible from code in other packages).
This restriction implies that there must be at most one such type per compilation unit.
This restriction makes it easy for a Java compiler to find a named class within a package.
In practice, many programmers choose to put each class or interface type in its own compilation unit, whether or not it is public or is referred to by code in other compilation units.

For example, the source code for a public type wet.sprocket.Toad would be found in a file Toad.java in the directory wet/sprocket , and the corresponding object code would be found in the file Toad.class in the same directory.

Above clarification is a little bit typical to understand, So let’s replace the “type” word with actual a class Toad to get more clarification,

Java compiler may give an error if Toad class is not found in Toad.java and either of following is true
  • Toad class is referred in other classes in same package.
  • Toad class is declared public.
This restriction implies that there must be at most one such Toad class per compilation unit.
And the reason behind this is,
This restriction makes it easy for a compiler for the Java programming language or an implementation of the Java virtual machine to find a named class within a package.

To get more clear picture let's imagine there are two public classes public class A and public class B in the same source file and class A have reference to the not yet compiled class B. And we are compiling (compiling-linking-loading) class A now while linking to class B compiler will be forced to examine each *.java files within the current package because class B doesn’t have its specific B.java file. So In above case, it is a little bit time consuming for the compiler to find which class lies under which source file and in which class the main method lies.

So the reason behind keeping one public class per source file is to actually make compilation process faster because it enables a more efficient lookup of the source and compiled files during linking (import statements). The idea is if you know the name of a class, you know where it should be found for each classpath entry and no indexing will be required.

And also as soon as we execute our application JVM by default looks for the public class (since no restrictions and can be accessed from anywhere) and also looks for public static void main(String args[]) in that public class. Public class acts as the initial class from where the JVM instance for the Java application (program) is begun. So when we provide more than one public class in a program the compiler itself stops you by throwing an error. This is because later we can’t confuse the JVM as to which class to be its initial class because only one public class with the public static void main(String args[]) is the initial class for JVM.

But why can we declare more than one non-public class (default access) in a single source file

Although there is no particular specification or reference to point why it is allowed to have more than one non-public class per source file. Presumably, the point is that developers are more likely to want to find the source code for a public class than a non-public one because developers don’t work on the same package provided by others so they don’t need to know the non-public classes. So compiler should not worry too much about linking non-public class because these are private to package.

But we should declare every class in its own file because it we will make the source short, simple, well organised and easy to understand.

You can find the complete source code for my blog on this Github Repository and please feel free to provide your valuable feedback.
In Java, we generally create objects using the new keyword or we use some DI framework e.g. Spring to create an object which internally use Java Reflection API to do so. In this Article, we are going to study the reflective ways to create objects.

There are two methods present in Reflection API which we can use to create objects
  1. Class.newInstance() → Inside java.lang package
  2. Constructor.newInstance() → Inside java.lang.reflect package
However there are total 5 ways create objects in Java, if you are not aware of them please go through this article 5 Different ways to create objects in Java with Example.

Both Class.newInstance() and java.lang.reflect.Constructor.newInstance() are known as reflective methods because these two uses reflection API to create the object. Both are not static and we can call earlier one on a class level object while latter one needs constructor level object which we can get by using the class level object.

Class.newInstance()

The Class class is the most popular class in Java after the Object class. However, this class lies in the java.lang package but plays a major role in Reflection API (java.lang.reflect.* package).

In order to use Class.newInstance() we first need to get the class level instance of that class for which we want to create objects. We can do this by two ways one is writing complete name of the class and appending .class to it and another is using Class.forName() method, So in below code Employee.class is similar to (Employee) Class.forName("org.programming.mitra.exercises.Employee")

Below code demonstrates how we can create objects using Class.newInstance()
Employee emp = Employee.class.newInstance();

Or
Employee emp = (Employee) Class.forName("org.programming.mitra.exercises.Employee").newInstance();

Class.newInstance() internally itself use the Constructor.newInstance() to create the object as we can see in the source code of Class class, notice line no 430 and 442 in below image.

Creating objects through Reflection in Java with Example

Constructor.newInstance()

In order to use Constructor.newInstance() method we first need to get constructor object for that class and then we can call newInstance() on it to create objects as shown below

Constructor<Employee> constructor = Employee.class.getConstructor();
Employee emp3 = constructor.newInstance();

It internally use sun.reflect.ConstructorAccessor class to get the object, which is Oracle's private API.

Difference between Class.newInstance() and Constructor.newInstance()

By name, both methods look same but there are differences between them which we are as following

1. Class.newInstance() can only invoke the no-arg constructor,
        Constructor.newInstance() can invoke any constructor, regardless of the number of parameters.

2. Class.newInstance() requires that the constructor should be visible,
       Constructor.newInstance() can also invoke private constructors under certain circumstances.

3. Class.newInstance() throws any exception (checked or unchecked) thrown by the constructor,
        Constructor.newInstance() always wraps the thrown exception with an InvocationTargetException.

Due to above reasons Constructor.newInstance() is preferred over Class.newInstance(), that’s why used by various frameworks and APIs like Spring, Guava, Zookeeper, Jackson, Servlet etc.

You can find complete code on this Github Repository and please feel free to provide your valuable feedback.
While being a Java developer we usually create lots of objects daily, but we always use the new or dependency management systems e.g. Spring to create these objects. However, there are more ways to create objects which we are going to study in this article.

There are total 5 core ways to create objects in Java which are explained below with their example followed by bytecode of the line which is creating the object. However, lots of Apis are out there are which creates objects for us but these Apis will also are using one of these 5 core ways indirectly e.g. Spring BeanFactory.

5-different-ways-of-object-creation-in-Java-with-example-and-explanation

If you will execute program given in the end, you will see method 1, 2, 3 uses the constructor to create the object while 4, 5 doesn’t call the constructor to create the object.


1. Using the new keyword

It is the most common and regular way to create an object and actually very simple one also. By using this method we can call whichever constructor we want to call (no-arg constructor as well as parametrised).

 Employee emp1 = new Employee();
 0: new           #19              // class org/programming/mitra/exercises/Employee
 3: dup
 4: invokespecial #21              // Method org/programming/mitra/exercises/Employee."":()V


2. Using Class.newInstance() method

We can also use the newInstance() method of the Class class to create objects, This newInstance() method calls the no-arg constructor to create the object.
We can create objects by newInstance() in the following way.

Employee emp2 = (Employee) Class.forName("org.programming.mitra.exercises.Employee")
                               .newInstance();

Or

Employee emp2 = Employee.class.newInstance();
51: invokevirtual    #70    // Method java/lang/Class.newInstance:()Ljava/lang/Object;


3. Using newInstance() method of Constructor class

Similar to the newInstance() method of Class class, There is one newInstance() method in the java.lang.reflect.Constructor class which we can use to create objects. We can also call a parameterized constructor, and private constructor by using this newInstance() method.

Both newInstance() methods are known as reflective ways to create objects. In fact newInstance() method of Class class internally uses newInstance() method of Constructor class. That's why the later one is preferred and also used by different frameworks like Spring, Hibernate, Struts etc. To know the differences between both newInstance() methods read Creating objects through Reflection in Java with Example.

Constructor<Employee> constructor = Employee.class.getConstructor();
Employee emp3 = constructor.newInstance();
111: invokevirtual  #80  // Method java/lang/reflect/Constructor.newInstance:([Ljava/lang/Object;)Ljava/lang/Object;

4. Using clone() method

Whenever we call clone() on any object JVM actually creates a new object for us and copy all content of the previous object into it. Creating an object using the clone method does not invoke any constructor.

To use the clone() method on an object we need to implements Cloneable and define clone() method in it.

Employee emp4 = (Employee) emp3.clone();
162: invokevirtual #87  // Method org/programming/mitra/exercises/Employee.clone ()Ljava/lang/Object;

Java cloning is the most debatable topic in Java community and it surely does have its drawbacks but it is still the most popular and easy way of creating a copy of any object until that object is full filling mandatory conditions of Java cloning. I have covered cloning in details in a 3 article long  Java Cloning Series which includes articles like Java Cloning And Types Of Cloning (Shallow And Deep) In Details With ExampleJava Cloning - Copy Constructor Versus CloningJava Cloning - Even Copy Constructors Are Not Sufficient. Please go ahead and read them if you want to know more about cloning.

5. Using deserialization

Whenever we serialize and then deserialize an object JVM creates a separate object for us. In deserialization, JVM doesn’t use any constructor to create the object.
To deserialize an object we need to implement the Serializable interface in our class.

ObjectInputStream in = new ObjectInputStream(new FileInputStream("data.obj"));
Employee emp5 = (Employee) in.readObject();
261: invokevirtual  #118   // Method java/io/ObjectInputStream.readObject:()Ljava/lang/Object;

As we can see in above bytecodes all 4 methods call get converted to invokevirtual (object creation is directly handled by these methods) except the first one which got converted to two calls one is new and other is invokespecial (call to the constructor).

I have discussed serialization and deserialization in more details in serialization series which includes articles like Everything You Need To Know About Java SerializationHow To Customize Serialization In Java By Using Externalizable InterfaceHow To Deep Clone An Object Using Java In Memory Serialization. Please go ahead and read them if you want to know more about serialization.

Example

Let’s consider an Employee class for which we are going to create the objects

class Employee implements Cloneable, Serializable {

    private static final long serialVersionUID = 1L;

    private String name;

    public Employee() {
        System.out.println("Employee Constructor Called...");
    }

    public String getName() {
        return name;
    }

    public void setName(String name) {
        this.name = name;
    }

    @Override
    public int hashCode() {
        final int prime = 31;
        int result = 1;
        result = prime * result + ((name == null) ? 0 : name.hashCode());
        return result;
    }

    @Override
    public boolean equals(Object obj) {
        if (this == obj)
            return true;
        if (obj == null)
            return false;
        if (getClass() != obj.getClass())
            return false;
        Employee other = (Employee) obj;
        if (name == null) {
            if (other.name != null)
                return false;
        } else if (!name.equals(other.name))
            return false;
        return true;
    }

    @Override
    public String toString() {
        return "Employee [name=" + name + "]";
    }

    @Override
    public Object clone() {

        Object obj = null;
        try {
            obj = super.clone();
        } catch (CloneNotSupportedException e) {
            e.printStackTrace();
        }
        return obj;
    }
}

In below Java program, we are going to create Employee objects in all 5 ways, you can also found the complete source code at Github.

public class ObjectCreation {
    public static void main(String... args) throws Exception {

        // By using new keyword
        Employee emp1 = new Employee();
        emp1.setName("Naresh");

        System.out.println(emp1 + ", hashcode : " + emp1.hashCode());


        // By using Class class's newInstance() method
        Employee emp2 = (Employee) Class.forName("org.programming.mitra.exercises.Employee")
                               .newInstance();

        // Or we can simply do this
        // Employee emp2 = Employee.class.newInstance();

        emp2.setName("Rishi");

        System.out.println(emp2 + ", hashcode : " + emp2.hashCode());


        // By using Constructor class's newInstance() method
        Constructor<Employee> constructor = Employee.class.getConstructor();
        Employee emp3 = constructor.newInstance();
        emp3.setName("Yogesh");

        System.out.println(emp3 + ", hashcode : " + emp3.hashCode());

        // By using clone() method
        Employee emp4 = (Employee) emp3.clone();
        emp4.setName("Atul");

        System.out.println(emp4 + ", hashcode : " + emp4.hashCode());


        // By using Deserialization

        // Serialization
        ObjectOutputStream out = new ObjectOutputStream(new FileOutputStream("data.obj"));

        out.writeObject(emp4);
        out.close();

        //Deserialization
        ObjectInputStream in = new ObjectInputStream(new FileInputStream("data.obj"));
        Employee emp5 = (Employee) in.readObject();
        in.close();

        emp5.setName("Akash");
        System.out.println(emp5 + ", hashcode : " + emp5.hashCode());

    }
}

This program will give the following output

Employee Constructor Called...
Employee [name=Naresh], hashcode : -1968815046
Employee Constructor Called...
Employee [name=Rishi], hashcode : 78970652
Employee Constructor Called...
Employee [name=Yogesh], hashcode : -1641292792
Employee [name=Atul], hashcode : 2051657
Employee [name=Akash], hashcode : 63313419
Plain Old Java Object or POJO is just an ordinary Java object, The term was originally coined by Martin Fowler, Rebecca Parsons, and Josh Mackenzie in September 2000.

According to Martin Fowler

The term was coined while Rebecca Parsons, Josh MacKenzie and I were preparing for a talk at a conference in September 2000. In the talk we were pointing out the many benefits of encoding business logic into regular java objects rather than using Entity Beans. We wondered why people were so against using regular objects in their systems and concluded that it was because simple objects lacked a fancy name. So we gave them one, and it’s caught on very nicely.

Generally, a POJO is not bound to any restriction and any Java object can be called a POJO but there are some directions. A well-defined POJO should follow below directions.
  1. Each variable in a POJO should be declared as private.
  2.     private long id;
        private String value = "";
        private Collection<Term> children = Collections.emptyList();
    

  3. Default constructor should be overridden with public accessibility.
  4.     public Term() {
        }
    

  5. Each variable should have its Setter-Getter method with public accessibility.
  6.     public long getId() {
            return id;
        }
    
        public void setId(long id) {
            this.id = id;
        }
    
        public String getValue() {
            return value;
        }
    
        public void setValue(String value) {
            this.value = value;
        }
    
        public Collection<Term> getChildren() {
            return children;
        }
    
        public void setChildren(Collection<Term> children) {
            this.children = children;
        }
    
  7. Generally POJO should override equals(), hashCode() and toString() methods of Object (but it's not mandatory).

  8. Overriding these methods will help us while using our POJO with different Java collection classes or writing it directly to console or inspecting it in debugger.

        @Override
        public int hashCode() {
            final int prime = 31;
            int result = 1;
            result = prime * result + ((value == null) ? 0 : value.hashCode());
            result = prime * result + ((children == null) ? 0 : children.hashCode());
            return result;
        }
    
        @Override
        public boolean equals(Object obj) {
            if (this == obj)
                return true;
            if (obj == null)
                return false;
            if (getClass() != obj.getClass())
                return false;
            Term other = (Term) obj;
    
            if (value == null) {
                if (other.value != null)
                    return false;
            } else if (!value.equals(other.value))
                return false;
    
            if (children == null) {
                if (other.children != null)
                    return false;
            } else if (!children.equals(other.children))
                return false;
    
            return true;
        }
    
        @Override
        public String toString() {
            return "Term [id=" + id + ", value=" + value + ", children=" + children + "]";
        }
    

  9. Overriding compare() method of Comparable interface used for sorting (Preferable but not mandatory).
  10.     @Override
        public int compareTo(Term term) {
            return (int) (this.id - term.id);
        }
    

And according to Java Language Specification, a POJO should not have to
  1. Extend prespecified classes, as in
  2.     public class Foo extends javax.servlet.http.HttpServlet {
    
        }
    

  3. Implement prespecified interfaces, as in
  4.     public class Bar implements javax.ejb.EntityBean {
    
        }
    

  5. Contain prespecified annotations, as in
  6.     @javax.persistence.Entity 
        public class Baz {
    
        }
    

However, developers and frameworks describe a POJO still requires the use prespecified annotations to implement features like persistence, declarative transaction management etc. So the idea is that if the object was a POJO before any annotations were added would return to POJO status if the annotations are removed then it can still be considered a POJO.
A JavaBean is a special kind of POJO that is Serializable, has a no-argument constructor, and allows access to properties using getter and setter methods that follow a simple naming convention.
As being a Java programmer we all know what is a reference, But let’s go through this again which it will help us to understand our current topic which is “Types of References in Java”.

All types in Java lies under two categories
  1. Primitive Types: There are 8 primitive types (byte, short, int, long, float, double, char and boolean) in Java which holds their values directly in form of bits. 
  2. Reference Types: All types other than primitive lies under the category of reference types e.g. Classes, Interfaces, Enums, Arrays etc. 
We can define a reference similar as primitive as

Employee emp = new Employee();

Here “new Employee()” is actually the object which gets space in heap, and “emp” is called reference variable which is holding the object, holding means “emp” variable stores the address of the object in form of bits.

As long as “emp” is holding this object it is not eligible for garbage collection. Because it is still in use and is reachable from “emp” reference.

Now if we assign a new object to “emp” it will hold the address of the new object and because now nobody is holding the reference of that old employee object it will become eligible for garbage collection.

Based on the behavior of references with Garbage Collector we can divide references into 4 sections given below in order from strongest to weakest.
  1. Strong References
  2. Soft References
  3. Weak References
  4. Phantom References

Strong References

These are your regular object references which we code daily:

Employee emp = new Employee();

The variable “emp” holds a strong reference to an Employee object and objects that are reachable through any chain of strong references are not eligible for garbage collection.
Usually, this is what you want but not always. Now suppose we are fetching lots of employees from database in a collection or map, and we need to do a lot of processing on them regularly, So in order keep performance we will keep them in the cache.

As far as this is good but now we need different data and we don’t need those Employee objects and these are not referenced from anywhere except the cache. Which is causing a memory leak because these objects are not in use but still not eligible for the garbage collection and we cannot remove those objects from cache because we don’t have reference to them?
So here either we need to empty the entire cache manually which is tedious or we could use other kind references e.g. Weak References.

Weak References

A weak reference does not pin an object into memory and will be GC’d in next GC cycle if not referenced from other references. We can use WeakReference class which is provided by Java to create above kind of caches, which will not store objects which are not referenced from somewhere else.

WeakReference<Cache> cache = new WeakReference<Cache>(data);

To access data you need to call cache.get(). This call to get may return null if the weak reference was garbage collected: you must check the returned value to avoid NPEs.
Java provides collections that use weak references e.g., the WeakHashMap class stores keys (not values) as weak references. If the key is GC’d then the value will automatically be removed from the map too.

Since weak references are objects too we need a way to clean them up (they’re no longer useful when the object they were referencing has been GC’d). If you pass a ReferenceQueue into the constructor for a weak reference then the garbage collector will append that weak reference to the ReferenceQueue before they’re finalized or GC’d. You can periodically process this queue and deal with dead references.

Soft References

A SoftReference is like a WeakReference but it is less likely to be garbage collected. Soft references are cleared at the discretion of the garbage collector in response to memory demand. The virtual machine guarantees that all soft references to softly reachable objects will have been cleared before it would ever throw an OutOfMemoryError.

Phantom References

Phantom references are the weakest of all reference types, calling get on them will always return null. An object is phantomly referenced after it has been finalized, but before its allocated memory has been reclaimed, As opposed to weak references which are enqueued before they’re finalized or GC’d Phantom references are rarely used.

So how are they useful? When you construct a phantom reference you must always pass in a ReferenceQueue. This indicates that you can use a phantom reference to see when your object is GC’d.

Hey, so if weak references are enqueued when they’re considered finalize but not yet GC’d we could create a new strong reference to the object in the finalizer block and prevent the object being GC’d. Yep, you can but you probably shouldn’t do this. To check for this case the GC cycle will happen at least twice for each object unless that object is reachable only by a phantom reference. This is why you can run out of heap even when your memory contains plenty of garbage. Phantom references can prevent this.
In the beginning, there was Make as the only build tool available. Later on, it was improved with GNU Make. However, since then our needs increased and, as a result, build tools evolved. The whole JVM ecosystem is dominated by three build tools:

  1. Apache Ant with Ivy
  2. Maven
  3. Gradle

Ant with Ivy

Pros
  • First among modern build tools, Similar to Make.
  • Easy to learn, that's why it became popular very soon.
  • Through Ant, you can have complete control over the build process.
  • Ant has the ability to include plugins.
  • Each element of work (a target in Ant’s lingo) can be combined and reused
Cons
  • Based on procedural programming paradigm.
  • Ant uses XML as the format.
  • Ant XML files speedily become unmanageably big even for small projects.
  • Ant does not have the predefined set of build cycles, we need to write the scripts for everything.
  • Ant is simply a Build tool, It doesn’t have dependency management system.
Later on, as dependency management over the network became a must, Ant adopted Apache Ivy.Later on, as dependency management over the network became a must, Ant adopted Apache Ivy.


Maven

Maven was released in 2004. Its goal was to improve upon some of the problems developers were facing when using Ant.

Pros
  • Maven comes with pre-defined targets for performing certain well-defined tasks such as compilation of code and its packaging.
  • Maven introduced the ability to download dependencies over the network (later on adopted by Ant through Ivy).
  • The main benefit from Maven is its life-cycle, As long as the project is based on certain standards, with Maven one can pass through the whole life cycle with relative ease.
Cons
  • Maven also uses XML as the format but follows different structure than Ant.
  • Dependencies management does not handle well conflicts between different versions of the same library (something Ivy is much better at).
  • Customization of targets (goals) is hard, Its harder to write custom build scripts in Maven then Ant.
  • Maven configuration is written in XML continuous being big and cumbersome.
In the mean time the interest for DSLs (Domain Specific Languages) continued increasing. The idea is to have languages designed to solve problems belonging to a specific domain. In case of builds, one of the results of applying DSL is Gradle.In the mean time the interest for DSLs (Domain Specific Languages) continued increasing. The idea is to have languages designed to solve problems belonging to a specific domain. In case of builds, one of the results of applying DSL is Gradle.


Gradle

Gradle combines good parts of both tools and builds on top of them with DSL and other improvements. It has Ant’s power and flexibility with Maven’s life-cycle and ease of use. Initially, Gradle used Apache Ivy for its dependency management. Later own it moved to its own native dependency resolution engine. The end result is a tool that was released in 2012 and gained a lot of attention in a short period of time, e.g. Google adopted Gradle as the default build tool for the Android OS.
Pros
  • Instead of XML, Gradle has its own DSL based on Groovy (one of JVM languages)
  • Build scripts are shorter and clearer than Ant or Maven.
Cons
  • Gradle doesn’t have the concept of parent projects that can provide inheritable version numbers.
This image explains all things in very brief

Comparisons through Code examples

We’ll create build scripts in all 3 frameworks that will compile, perform static analysis, run unit tests and, finally, create JAR files, And then we’ll compare the syntax. By comparing the code for each task we’ll be able to get a better understanding of the differences and make an informed decision regarding the choice of the build tool.

Ant with Ivy

Ivy dependencies need to be specified in the ivy.xml file.

[ivy.xml]
<ivy-module version="2.0"
    xmlns:xsi="http://www.w3.org/2001/XMLSchema-instance"
    xsi:noNamespaceSchemaLocation="http://ant.apache.org/ivy/schemas/ivy.xsd">
    <info organisation="org.apache" module="java-build-tools" />

    <dependencies>
        <dependency org="junit" name="junit" rev="4.11"></dependency>
    </dependencies>
</ivy-module>

Task of this build.xml is to compile the source code and generate a JAR file.

[build.xml]
<project xmlns:ivy="antlib:org.apache.ivy.ant" name="java-build-tools" default="jar">
    <property name="src.dir" value="src" />
    <property name="build.dir" value="build" />
    <property name="classes.dir" value="${build.dir}/classes" />
    <property name="jar.dir" value="${build.dir}/jar" />
    <property name="lib.dir" value="lib" />
    <path id="lib.path.id">
        <fileset dir="${lib.dir}" />
    </path>

    <target name="resolve">
        <ivy:retrieve />
    </target>

    <target name="clean">
        <delete dir="${build.dir}" />
    </target>

    <target name="compile" depends="resolve">
        <mkdir dir="${classes.dir}" />
        <javac srcdir="${src.dir}" destdir="${classes.dir}" classpathref="lib.path.id" />
    </target>

    <target name="jar" depends="compile">
        <mkdir dir="${jar.dir}" />
        <jar destfile="${jar.dir}/${ant.project.name}.jar" basedir="${classes.dir}" />
    </target>
</project>

To run the Ant task that creates the JAR file you need to execute following.

ant jar

Maven


[pom.xml]
<project xmlns="http://maven.apache.org/POM/4.0.0" 
        xmlns:xsi="http://www.w3.org/2001/XMLSchema-instance"
        xsi:schemaLocation="http://maven.apache.org/POM/4.0.0 http://maven.apache.org/maven-v4_0_0.xsd">

    <modelVersion>4.0.0</modelVersion>
    <groupId>com.programming.mitra</groupId>
    <artifactId>java-build-tools</artifactId>
    <packaging>jar</packaging>
    <version>1.0</version>

    <dependencies>
        <dependency>
            <groupId>junit</groupId>
            <artifactId>junit</artifactId>
            <version>4.11</version>
        </dependency>
    </dependencies>

    <build>
        <plugins>
            <plugin>
                <groupId>org.apache.maven.plugins</groupId>
                <artifactId>maven-compiler-plugin</artifactId>
                <version>2.3.2</version>
            </plugin>
        </plugins>
    </build>
</project>

To run the Maven goal that creates the JAR file, execute following.

mvn package

The major difference is that with Maven we don’t need to specify what should be done. We’re not creating tasks but setting the parameters (what are the dependencies, what plugins to use…). This shows the major difference between Ant and Maven. Later promotes the usage of conventions and provides goals (targets) out-of-the-box. Both Ant and Maven XML files tend to grow big with time. To illustrate that, we’ll add Maven CheckStyle, FindBugs and PMD plugins that will take care of static analysis. All three are fairly standard tools used, in one form or another, in many Java projects. We want all static analysis to be executed as part of a single target verify together with unit tests. Moreover, we should specify the path to the customs check style configuration and make sure that it fails on error. Additional Maven code is following:

[pom.xml]
<plugin>
    <groupId>org.apache.maven.plugins</groupId>
    <artifactId>maven-checkstyle-plugin</artifactId>
    <version>2.12.1</version>
    <executions>
        <execution>
            <configuration>
                <configLocation>config/checkstyle/checkstyle.xml</configLocation>
                <consoleOutput>true</consoleOutput>
                <failsOnError>true</failsOnError>
            </configuration>
            <goals>
                <goal>check</goal>
            </goals>
        </execution>
    </executions>
</plugin>
<plugin>
    <groupId>org.codehaus.mojo</groupId>
    <artifactId>findbugs-maven-plugin</artifactId>
    <version>2.5.4</version>
    <executions>
        <execution>
            <goals>
                <goal>check</goal>
            </goals>
        </execution>
    </executions>
</plugin>
<plugin>
    <groupId>org.apache.maven.plugins</groupId>
    <artifactId>maven-pmd-plugin</artifactId>
    <version>3.1</version>
    <executions>
        <execution>
            <goals>
                <goal>check</goal>
            </goals>
        </execution>
    </executions>
</plugin>

To run the Maven goal that runs both unit tests and static analysis with CheckStyle, FindBugs, and PMD execute following.
mvn verify
We had to write a lot of XML that does some very basic and commonly used set of tasks. On real projects with a lot more dependencies and tasks, Maven pom.xml files can easily reach hundreds or even thousands of lines of XML.

Gradle

[build.gradle]
apply plugin:'java'
apply plugin:'checkstyle'
apply plugin:'findbugs'
apply plugin:'pmd'

version ='1.0'

repositories {
    mavenCentral()
}

dependencies {
    testCompile group:'junit', name:'junit', version:'4.11'
}

Not only that the Gradle code is much shorter and, to those familiar with Gradle, easier to understand than Maven, but it actually introduces many useful tasks not covered with the Maven code we just wrote. To get the list of all tasks that Gradle can run with the current configuration, please execute the following.

gradle tasks --all

Gradle has a lot of tasks already available out-of-the-box or through plugins. For example, by seeing the following line it is probably not clear to those not initiated into mysteries of Gradle what tasks will be unlocked for us to use.

Simple apply plugin:'java' code more than 20 tasks waiting for us to use.
Next Post Newer Posts Previous Post Older Posts Home